Sunday, October 14, 2012

Halloween Stitching


I saw this little quilt on an awesome blog that I ran across called Aunt Polly's Porch and it was on the cover of Quilting Celebrations magazine and knew I had to make it.  It is done using a fusible applique method so it stitches up quickly.  I bought the stand from Ackfeld Wire  just like it was displayed in the magazine and I plan on using the template for future little quilts .  If I would have worked on this in one block of time it probabley would only have taken about 4 hours max to complete.


I wanted to show the back because the magazine didn't show how it was hung and neither did the site where I bought the stand.  You just make an upside down pocket and a half circular shaped wire piece on the stand fits up inside the pocket to hold it together.  CUTE!
Posted by Picasa

Sunday, September 9, 2012

Seen and completed in one day - a world's record!


One of the things I've always admired (and been nervous to try to do) is free motion quilting / embroidery.  This morning on Quilting Arts TV there was a short segment on this type of thing that I thought just might be a good beginner project and as an artistic bonus it also involved painting on fabric.

Basic steps were to draw a simple picture (so simple that I copied their dragonfly idea) copy that off onto a piece of fabric which is then placed on top of batting and free motion quilted. Once you do that you simply dilute acrylic paint 6 parts to 1 and go to town painting.  The paint does bleed but I liked the effect.  Once it dries you layer that piece onto felt and use a decorative thread and a nice stitch to stitch to the felt.   

 Thank goodness it was supposed to have a stitchy-sketchy look but if I ever get good at this one day I know I'll probably look back on this example and get dry heaves. Hehehe. It was fun though.  Now I need to take a drawing class because that dragonfly was stretching the limits of my skills in that area and even so it  was copied from the TV show.
Posted by Picasa

Hey, why don't you just go...


This is a project that I found on the Bernina blog.
All of the letters I used were purchase from Embroidery Libary.  There are tons of pretty fonts to choose from so if you are interested just take a look and pick three.  I looked for large sized monograms that were approx. 6" tall.


I did use stretcher bars in two sizes - 12" and 28" and used some wood glue in the joints because I saw that tip on another blog.  The only thing holding this up is 3 thumb tacks in the wall.  Light weight, easy, and a handy reminder.
 
Posted by Picasa

Monday, July 30, 2012

Earbud Case

I've recently started working out at the gym and it helps me to listen to rousing music while I ride the stationary bike.  Up until today I've just been shoving my headphones into a pocket but now they have a nifty little case thanks to the blog Dog Under My Desk & Erin Erickson's tutorial -

Circle Zip Earbud Pouch Tutorial

This project stitched up pretty quickly and painlessly and I plan on making a few more as gifts.

I would probably be a little more careful in putting in the zipper as one side but all in all not too bad.


Friday, June 8, 2012

Potholder for Lotta

Lotta is a wonderful blogger who is a member of one of my yahoo groups.  Her blog, Squirrels Do Sew, is a good one to keep an eye on because she posts something almost daily.


This is a potholder tutorial she posted a while back and Lotta was very helpful to me when I got stuck and had a few questions about the project.  I promised her I would send her a photo of the finished project but since it was almost exactly like hers I hesitated.  It's hard to improve upon perfection don't you think?

The Pepper and Salt designs both came from Embroidery Library.

Thanks Lotta!

Thursday, June 7, 2012

Sewing Room Redo - Intermediate Stage

 
I like to say this is the room in the "intermediate stage" because it is still pretty disorganized.  I carefully edited out the extra messy parts - like under the cutting table.  Anyway, underneath that fancy machine cover sits my Brother 2800 that you saw in my earlier post. The cover is ACTUALLY for my new-to-me Pfaff Creative Vision 5.5 (hello 14"x14" embroidery sewing area) but since I use the Pfaff more - I use it to cover poor Brother.  It's so traitorous because the designs used on the cover are actually built in designs on my Pfaff.   You can see my darling Pfaff two pictures below but you won't see a caption near it because Blogspot is being silly right now and won't let me move around. So, peruse the room at your own pace.  A reminder that clicking on any photo will bring it up bigger (except for the first one - again Blogspot weirdness).
 
Above are a few shots of my 2 new Billy bookcases from Ikea.  I was able to squeeze one in next to my Pfaff sewing area.  It's holding some of my embroidery thread, my Janome Embellisher, Anita Goodesign embroidery packs and the other holds mostly fabric wrapped around the comic book backer boards as you can see above.

I sacrifice some good wall space to have a bed in here but I love to lay down and read while the machine embroiders and it's a good place to plan out my next project.  I also love it at night.  The Black Willow is next to this window and a huge wild rose right below so there is always a bird out there hanging around.  From that window, I can look out to the start of wild fields and a hill with small herd of cattle and look up to the stars at night and, if I get lucky, and it's cool enough for the window to be open I might hear the owl that comes around sometimes.  See how I wax poetic over this bed...
Posted by Picasa

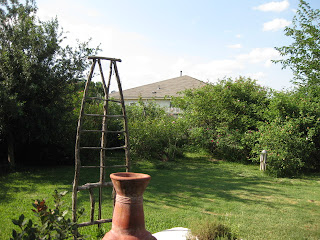
The Yard - Before the Summer Smackdown


I moved into this house on December 11, 2002 six months after moving to Austin from Atlanta, GA.  I watched it go from a dirt lot to my own little nest.  It even came with my first dog Bucky.  He was roaming one of the nearby fields with a few other dogs. The day I saw my newly poured driveway he was curled up sleeping on it.  He's never left and he's the BEST dog.

The first two years I lived here my parents came and helped me plant the flower beds in front, moved a live oak from the front yard to the back yard and just helped me get it going.  Incidentally, I am one of about 5 people out of 250 who had the foresight (ok the folks had the foresight) to put a tree in the backyard and I am SOOOO thankful.

My folks haven't been to visit since so I took a few pictures yesterday to show them how it's grown up and what I've added to the yard.  It looks pretty good considering the horrible drought we had last year.  I tried to water but we had severe water restrictions and with 90 days of over 90 degree weather and something like 60 of 100plus it was brutal.

This rose is a good deal longer and taller than my Honda Civic.  It is an antique rose called Mrs. B.R. Cant and actually looks better from my neighbors side.

The tall tree on the side reaching above my house was planted by a bird.  I have a few of those and they all grew really fast.
 

There's Bucky walking away to see if one of his cat buddies is in the cat "yard inspection" chair.  The tree you see there is another bird planted tree and is a mulberry tree.
Posted by Picasa

Colorful Project Inspired by Mom


I usually get to visit my family in Ocala, FL about once a year.  Each year before I go, my mom and I pick out a fun project to work on while I'm there.  Last year she picked out this table-runner tutorial that she found in one of the embroidery magazines and I promise when I find it in one of my notebooks I'll come back and say which one if anyone is interested. 

Anyway, we each made one and embroidered the blocks and then pieced it  later on after I left.  The "M" is from Embroidery Library and the other two designs are from Dalco and had the applique pieces laser cut already.  I added crystals as per the magazines suggestions.  I had to buy a hot fix tool but it was kinda fun to see the glitz.


It's was really fun to work on.
 
Posted by Picasa

Wednesday, June 6, 2012

Summery Windsock


One of my yahoo groups went into a frenzy last year when someone  made a windsock and posted it on the group page.  Of coarse, not to be left out, I also went crazy and searched the web for tutorials on windsock making and I was flummoxed at how little info was to be had for the manufacture of these super summery garden must-haves.

I did prevail and madeit and used some new-that-week Embroidery Library mylar designs and I think it turned out pretty good.  You can see in the picture above that darling Bucky seems to approve. Not my arm by the way.

One thing the tutorial did say was to use a sturdy thread in your serger when serging the sides of each strip as serger thread won't hold up well in the weather.  Did I listen? No.  I was too lazy to change out all those threads and, did the windsock hold up well.  Again. No.  Also, here is the best advice I can give you, don't hang it on a limb that is close to the trunk of the tree or another tree limb.  It's tricky.  My windsock perpetually hugs the trunk and it's no fun to untangle.


I really love it though and I might just start looking for designs for another one.
Posted by Picasa

Early Machine Embroidery Projects


When I first put up this post about 10 minutes ago I typed up a wonderfully detailed blurb about each set of pictures.  When I went to save and post I got some kind of wacked out error message and viola! no words.  So all I will say is these were some of my first machine embroidery projects.  All designs were purchased at Embroidery Library except the tiki head and ahoy that came from Urban Threads.  Oh, I should mention that I don't document myself very well and some of these were taken with my cell phone and hence a really cruddy photo. Also, after reading back through earlier posts I see that a couple of these were posted a while back.  So, you're getting double goodness.
 
Above is a reusable sandwich bag with a lining made out of ripstop nylon.  The tutorial and design can be found on Embroidery Library's site
Posted by Picasa